Completing a dollhouse project feels like bringing a miniature world to life. It’s more than just a hobby—it’s a creative journey that deserves recognition. Once finished, the question becomes how to display it in a way that highlights every thoughtful detail. Whether you’re sharing it with guests, showcasing it to fellow miniaturists, or simply enjoying it at home, finding the right setting is key. With the right approach, your dollhouse can go from a personal passion to a centerpiece that tells its own story.
Choosing the Right Display Location
Selecting the perfect spot to display your completed dollhouse project can make all the difference in how it’s perceived and appreciated. By considering a few key factors, you ensure that your miniature masterpiece is showcased beautifully and becomes a treasured part of your space.
Consider Room Lighting
Lighting can bring your dollhouse project to life, just as it would enhance a room in your actual home. A well-lit dollhouse reveals its intricate details and elevates its presence. Natural light is ideal, but avoid positioning your dollhouse in direct sunlight, which could fade delicate materials over time. Artificial lighting, such as LED spotlights or low-intensity lamps, works wonderfully to create dramatic shadows and highlights that draw the eye. For more lighting inspiration, this dollhouse lighting guide offers practical tips on how to get it just right.
Accessibility for Viewing
A good display location balances the aesthetic and practical aspects of viewing. Place your dollhouse where it’s easily accessible, allowing you and visitors to take in all its details up close. Avoid high shelves or narrow corners that require awkward angles to appreciate the craftsmanship. The placement should also be secure, preventing accidental bumps or damages. Think of it as displaying a prized painting in a gallery—it needs to be at eye level and within reach without being disruptive to the environment.
Aesthetics of the Surrounding Area
The backdrop and surrounding elements around your dollhouse should complement its style rather than compete with it. For example, if your dollhouse reflects a Victorian aesthetic, a modern, minimalist living space might feel disjointed. Consider a neutral or thematically relevant background that allows the miniature details to stand out. You
Methods of Displaying Your Dollhouse
The way you showcase your dollhouse project can significantly impact how it’s appreciated. A display can protect your work, highlight its intricate details, and ensure it’s a stunning centerpiece in your space. Here are some of the most thoughtful methods to consider for your completed creation.
Using A Display Case

Photo by Valeria Boltneva
A display case offers one of the most polished and secure ways to showcase your dollhouse project. Glass display cases, in particular, provide excellent protection against dust, debris, and curious hands. They also significantly reduce the risk of accidental damage, keeping your intricate work intact. Display cases often come with built-in lighting options, which can enhance the visibility of fine details by casting soft glows or dramatic highlights. For collectors, they bring the added benefit of emphasizing the value and uniqueness of the piece, much like museum-quality exhibits. For a detailed comparison between glass and acrylic cases, this guide on display cases is a great resource.
Open Shelving vs. Closed Displays
Choosing between open shelving and closed displays depends entirely on your preferences and priorities. Open shelving is an excellent choice for easy access, allowing viewers to appreciate the dollhouse from multiple angles. It creates an inviting display where every detail is open for admiration. However, it does leave the dollhouse more exposed to dust and potential damage, requiring frequent cleaning or touch-ups.
Closed displays, whether glass-fronted cabinets or full cases, offer added protection and often look more refined. They feel more structured and can fit effortlessly into spaces where a minimalist or cohesive aesthetic is desired. While they might limit some viewing angles, they create a windowed effect that places your dollhouse as the center of attention, much like looking through a perfectly framed scene. Learn about different shelving options via this discussion on dollhouse displays.
Creating a Themed Display
For a truly immersive and attention-grabbing showcase, create a themed display area around your dollhouse. Think of it as designing a set for a miniature production. If your dollhouse is Victorian, surround it with vintage trinkets, lace decor, or antique-style frames. A modern dollhouse could benefit from sleek, minimal decor for contrast. Bringing thematic elements into the backdrop gives the dollhouse a cohesive narrative. Consider custom miniature furniture, small decorative pieces, or even matching wallpaper to tie the whole look together. Check out some display ideas here for inspiration on making your dollhouse stand out.
Thoughtful displays combine practicality with artistic elements. Whether you opt for safety, aesthetics, or theme-focused setup, remember that every choice you make adds a personal touch to your collection.
Accessorizing Your Display
Adding the right accessories to your dollhouse display can elevate its charm and immerse viewers into its world. From thoughtfully placed miniature furniture to detailed backgrounds and scenery, accessorizing plays a pivotal role in telling the story of your creation.
Incorporating Miniature Furniture

Photo by dada _design
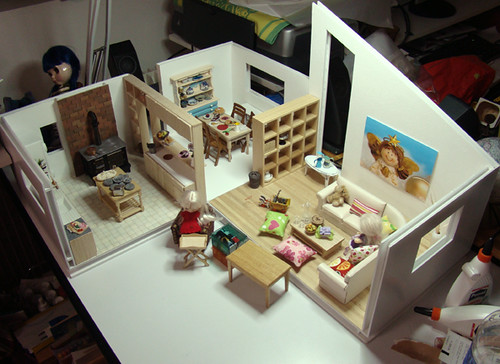
How furniture is arranged inside your dollhouse can make or break its realism. Consider the way rooms flow in a full-sized home—miniature layouts should take similar elements into account. Start by assigning each room a clear purpose: a cozy living area, a sophisticated dining room, or an inviting nursery. Once that’s established, use proportional, life-like furniture that fits both the style and scale of the structure.
Focus on strategic placement to create a logical and inviting layout. For example, placing a sofa directly facing a fireplace adds warmth to a living room scene, while an ornate bed with matching nightstands anchors a bedroom. Pay careful attention to negative space—overloading a room with too many pieces can make it feel cluttered and less visually appealing. Instead, go for realism by balancing larger items like tables and beds with smaller, decorative touches such as books, lamps, or plant pots.
For resources to find miniature furniture and accessorizing tips, you can explore Shop Miniature Furniture Accessories, which offers various options to decorate your project.
Adding Backgrounds and Scenery
The right background and scenery can completely transform your dollhouse display. Think of it as completing a piece of art with the perfect frame. A plain wall behind your dollhouse might seem fine, but adding a custom backdrop or supporting scenery can enhance the visual depth and narrative of your mini-project.
Start by choosing a background that complements the setting of the dollhouse itself. For example:
- Victorian dollhouses pair well with wallpaper featuring floral patterns or vintage tones.
- Modern designs benefit from clean, neutral tones or bold, graphic prints.
You can even incorporate miniature backdrops that mimic outdoor scenes like gardens, cityscapes, or ocean views, further expanding the world you’ve created. Another idea is to use lighting effects to bring the backdrop to life—soft blue LEDs can simulate a night sky, while warm tones can emulate a sunny day.
Scenery outside the dollhouse also plays a role. Try adding elements such as miniature fences, tiny trees, or faux grass patches to create a cohesive environment. Even strategic placement of related accessories like a small bench or bicycle can bring a whimsical touch to the façade. For ideas, browsing custom display vignette cases can offer inspiration.
By incorporating intentional layouts and creative backdrops, your dollhouse evolves from a collection of miniatures into a story-rich display that’s guaranteed to captivate.
Photography Techniques for Showcasing Your Dollhouse
Photographing your dollhouse project is a rewarding way to share your creativity with others. The right techniques can emphasize its intricate details and tell the story you’ve crafted. From selecting angles to adjusting lighting, each step ensures your dollhouse looks as impressive on screen as it does in person.
Choosing the Right Angle
Angles are everything when it comes to photography. A good angle transforms an image, allowing viewers to see details they might otherwise miss. Think about how you view your dollhouse in real life—do you find certain positions naturally highlight its features?
For dollhouses, eye-level shots work exceptionally well. They mimic interacting with a full-scale home, offering a realistic perspective. Try experimenting with these ideas:
- Straight-on shots emphasize symmetry and balance.
- Slightly offset angles create depth, adding layers to the scene.
- Overhead views are excellent for showcasing room layouts or specific features like rooftops.
Avoid overly wide angles unless the shot calls for it. Too much distortion can make finely tuned details appear out of proportion. When in doubt, spend a few moments moving your camera or phone around to see what feels right before snapping.
Utilizing Lighting for Photos
Lighting can elevate your dollhouse’s visuals, adding warmth and depth to your photos. While it might feel complicated, great lighting is achievable with simple tools.
Start with soft lighting to reduce harsh shadows. Natural light works beautifully, especially during late morning or early afternoon, when sunlight is diffused. Position your dollhouse near a window for even coverage, but avoid direct sunlight to prevent glare or washed-out colors.
If artificial lighting is more practical, use lamps with adjustable settings. LED ring lights or desk lamps with daylight bulbs are excellent choices. Plus, combining light sources at different angles can highlight textures and shapes without overwhelming the photo. Need more control? A DIY lightbox—white poster boards taped together to create a small studio—can give professional-looking results.
For more lighting tips, check out this guide on photographing dollhouses. It covers how to balance natural and artificial light sources effectively.

Photo by cottonbro studio
Editing Photos for Enhancement
Even the best photos can benefit from a little post-production. Editing helps fine-tune the lighting, color tones, or any other element that might need adjustment.
Start with basic edits:
- Brightness and contrast: Brighten slightly and increase contrast to make details pop.
- Crop and align: Adjust the framing so the focus stays on your dollhouse.
- White balance adjustments: Correct unnatural color tints caused by lighting differences.
Whether you use simple apps like Snapseed or advanced tools like Photoshop, polish without over-editing. The goal is to amplify the charm of your creation, not transform it beyond recognition. Fine details matter, especially for dollhouse enthusiasts who notice the smallest imperfections.
For more insight, this guide offers practical tips to perfect miniature photography. From lighting tricks to composition tweaks, it’s full of useful advice.
With practice, your dollhouse photos can become works of art in themselves. Whether online or printed, they’ll highlight your project beautifully.
Sharing Your Dollhouse Project with the Community
After completing your dollhouse project, sharing it with others can be one of the most fulfilling parts of the journey. Showcasing your hard work invites admiration, connects you with like-minded people, and often leads to inspiration from their feedback. Whether through digital spaces or physical gatherings, there are many ways to display your creation proudly.
Using Social Media Platforms
Social media platforms are a treasure trove for sharing creative projects, and dollhouses are no exception. These channels provide both a stage to present your work and a space to engage with a broader audience. Platforms like Instagram, with its visual appeal, are particularly popular for dollhouse enthusiasts. You can upload detailed snapshots of individual rooms, furniture arrangements, or even the exterior of your project. Caption your posts with interesting details about your inspiration or the techniques you used.
For a more dynamic presentation, consider creating short videos or time-lapse clips for platforms like TikTok or YouTube. These showcase the intricacy of your project in a way that still images might not. Tagging relevant hashtags like #DollhouseProject and #MiniatureWorld ensures your content reaches those interested in dollhouses and miniatures.
Pinterest is another excellent space for sharing and finding inspiration. You can create dedicated boards to showcase your dollhouse from concept to completion. This not only allows others to appreciate your work but also serves as a resource for newcomers to the hobby.
For stellar examples of social media accounts celebrating dollhouse projects, explore this collection of inspiring dollhouse Instagram profiles.

Photo by Yan Krukau
Joining Dollhouse Community Groups
Online and offline dollhouse groups are invaluable when it comes to showcasing your work while learning from others. Forums such as The Greenleaf Miniature Community and r/Dollhouses on Reddit are hubs of activity where creators from around the world share ideas, ask for advice, and celebrate one another’s projects. These groups are a great way to connect with people who share your excitement for miniatures.
Facebook also hosts niche groups focusing on dollhouses and miniatures. These communities often have ongoing discussions, challenges, and photo-sharing posts, making them an interactive way to display your work and gain feedback in real time. For those interested in a more tailored experience, smaller forums like The Dolls House Forum allow for intimate interactions and detailed discussions.
In-person clubs or meetups, if available in your area, bring an extra layer of connectivity. Many local hobby groups arrange exhibitions where enthusiasts can showcase their projects. This face-to-face interaction can help you build strong relationships with others who share your passion.
Ultimately, joining a community enriches your appreciation for the craft. It transforms dollhouse building from a solo endeavor into a shared experience celebrated and supported by others. For more ideas on where to share your project, check out this guide on miniature communities.
Maintaining Your Dollhouse Display
Your dollhouse is more than a collection of miniature items; it’s a display of creativity and craftsmanship. To keep it looking its best, regular maintenance is essential. From keeping dust at bay to ensuring it remains sturdy and damage-free, these practices will preserve your dollhouse for years to come.
Cleaning and Dusting Tips

Photo by Ron Lach
Dust and dirt, even in tiny amounts, can detract from the beauty of a dollhouse project. Regular cleaning, when done carefully, ensures every detail remains as vibrant as the day it was completed. But how can you clean without causing damage?
Start with a soft-bristled brush or a microfiber cloth to gently sweep away dust. These tools are gentle on delicate surfaces while effectively cleaning corners and crevices. Avoid harsh abrasive materials that could scratch or dull your dollhouse’s finish. If you’re dealing with stubborn dust accumulation, try using compressed air in short bursts to dislodge particles from tight spaces.
For wooden areas, a dab of furniture polish or lemon oil on a cloth can keep surfaces looking polished and new. However, make sure to wipe away excess polish to avoid sticky residue. Dealing with fabric-covered items? Use a lint roller or sticky tape to pick up lint without tugging at the material. For detailed furniture or intricate decor, cotton swabs dipped in mild soapy water can help. Be patient—attention to detail is key in preserving your miniature masterpiece.
To learn more about cleaning techniques for dollhouses, check out this helpful guide on cleaning your dollhouse.
Regular Inspection for Wear and Tear
Like any cherished item on display, a dollhouse is prone to minor wear and tear over time. Regular inspections are your best defense against damage that might escalate. Think of it as a health check-up for your mini home.
Begin by examining structural components such as walls, doors, and windows. Check if any joints are becoming loose, particularly in older wooden dollhouses. If you notice wobbly sections or cracks, address them immediately with wood glue or filler. Neglecting these small issues can lead to major repairs down the road.
Tiny decorations like vases, picture frames, or furniture legs are also worth inspecting. Small cracks or missing pieces can quickly get worse if left unnoticed. For lighting installations, make sure the wiring is intact and that all bulbs are functioning. Broken lights can detract from the overall effect and might signal deeper wiring issues.
Preserve painted surfaces by occasionally repainting or touching up areas showing signs of wear. Be cautious to match the original colors and finishes to maintain the authenticity of your dollhouse’s style. Regular maintenance not only keeps everything in pristine condition, it also makes your masterpiece more enjoyable to admire and share.
For more advice on dollhouse maintenance, the Greenleaf Miniature Community’s forum provides insightful tips here.
By establishing a cleaning and inspection routine, you can ensure your dollhouse remains the stunning centerpiece you envisioned, preserving its artistry for years to come.
Conclusion
Showcasing your completed dollhouse project is a celebration of your creativity and attention to detail. Whether displayed in a case, on a shelf, or with themed accessories, the way you present your work tells its own story. It’s an opportunity to share your passion with others while preserving the charm of your creation.
Each decision—lighting, placement, or presentation style—contributes to transforming your dollhouse into a captivating centerpiece. What matters most is creating a display that reflects your vision and invites admiration.
What’s your favorite way to display your dollhouse? Let the miniature-loving community know, and inspire someone else to showcase their masterpiece.


